"Why in the world did you pick this name for your blog?" ...so glad you asked...

Tuesday, August 28, 2012

More Fall Sewing for the Little Ones

I've been continuing to work through all the things I cut out for fall sewing.  I'm trying to be good and finish things instead of just starting them.  I really do like doing the marathon pattern cutting sessions (well, not the sessions themselves) because they make only having a quick half-hour to sew much more productive.  I can just grab a plastic baggie that has my pattern instructions and my already cut fabric and get to work.
Here's a newer pattern in my stash from Burda. (I'll have to check the number later.)  This is the very first time I've bought a Burda pattern.  I never even look through the pattern catalog for Burda when I look for patterns, but I couldn't find a cute overalls pattern in the other books.
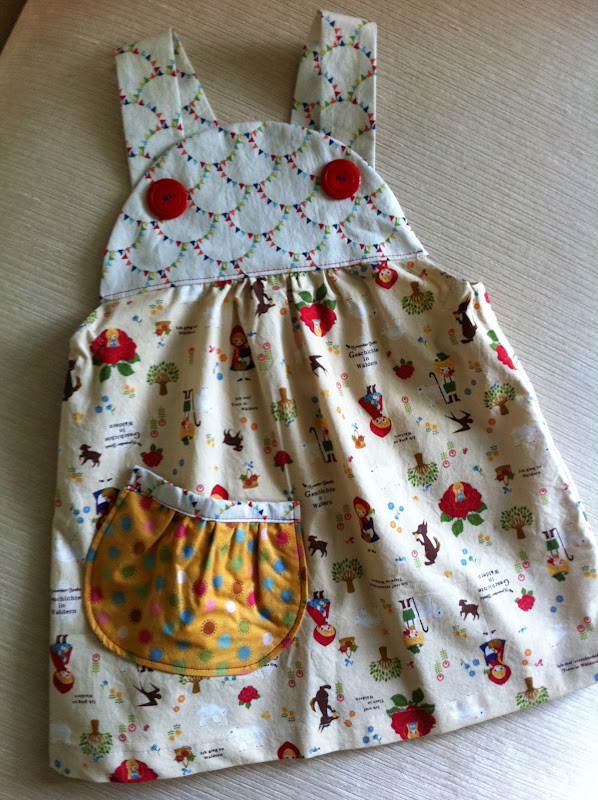
This is the little jumper and I made it with the purpose of using up the red riding hood and bunting fabric and at the same time, giving my 4-year old something to wear with her new Gymboree red corduroy pants I bought her for winter.
This runs big but the pieces are well drafted and the instructions are good.  it's a nice little pattern.
I have the overalls cut out for my 2-year-old and hope to get to them soon.


This is a v-neck knit dress (recognize that combo?) called the Sonya Dress from 5 Berries
I like the look of the dress, although the picture on the site is somewhat deceiving because the dress on the dress form is belted, so it looks like a slimmer cut than it actually is.  You can see that the dress is pretty much just an a-line, but you could change the shape and nip it in at the waist or add shirring or add belt carriers for a ribbon or sash.
I had a heck of a time with the v-neck.  I can't say whether that was user error or the instructions not being detailed enough.
Some coral ruffle pants would be divine with this.

  
Next we have the Maggie Mae dress from Schwin and Schwin.  I know lots of people adore their patterns, but, to be completely honest, I'm having buyer's remorse about the three patterns I purchased from them. :(  (I have the Lovely Rita's and the Abbey Jacket also.)
The patterns are designed for beginners, but I think they could've done some nicer finishes on the button placket in the back and lining without compromising the easy-ness of the pattern. Also, the pleats on front and back are not marked on the pattern.  You are left completely on your own to figure out where to put them and how to make them even.  I have attempted this pattern before and got so frustrated with the pleats that I threw the dress away! 
I was prepared this time, but I still got steamed that I had to spend so much time on the pleats when they could very easily have been marked on the pattern.  If you want it to be easy, then make it easy. If you look at the Flickr group, you'll see all different sizes and placement of pleating.
I got mine pretty near perfect on the front, but I was in a hurry for the back, so they are not perfectly centered.  arg.
Charcoal or peony pink velour or minky pants would cozy this up.


Last, but not least (because it's actually my favorite) my third time making the Brownie Goose Nelle dress.  I love the way this dress shows off fabric.  For some reason, I just don't feel like I need to mix a bunch of fabrics on this dress.  All three times I've made it, I've used just one fabric for the dress.  This is the first time I've added trim on the sleeves.  I ordered several colors of Riley Blake crochet trim with my last Fabric.com order, so this won't be the last time you see it.
Now, you wouldn't really think this would be for fall, but I just so happened to order some periwinkle/purple knit to make myself a pair of Mama ruffles and had enough left over to make some baby ruffles too and they look DIVINE with this dress!


here, let me show you...


SEE!?  I really lucked out.  I added some reproduction vintage fabric for the pocket.
The pocket is from the Monkey's Bug Sweet Sailor Shorts pattern.  I think it's so cute, I just keep putting it on stuff.   


Wouldn't you?  :)


Monday, August 27, 2012

Separates That are More Awesome Together


I have two new pieces to show you today!  Two awesome knits 
= two easy-to-wear pieces that have lots of visual interest.
Both of these patterns I've sewn before and both I made modifications to.  I made and blogged about the shirt here.  This time, I made the cowl less cowly by moving the front "cut on fold" line about an inch off the fold of the fabric, effectively narrowing the front piece by two inches.  I tapered out to a bit wider waist line, but this chevron knit is super stretchy, so I wasn't too worried.
The skirt was attached to a dress the first time I made it.  This time, I used the skirt pieces from the pattern and, instead of attaching them to the top part of the dress, I added a yoga waistband.
And now for a gratuitous number of pictures...


Thursday, August 16, 2012

Amy Butler Birdie Sling Number Two

The Amy Butler Birdie Sling was the first bag I ever made.  Well, I tried the Buttercup Bag, a free pattern from Made By Rae, but I failed utterly and pretty much don't even count it.
I had no knowledge of bag making and didn't really aspire to make one until I saw this big beautiful bag someone was using as a diaper bag in the signing class I was taking Eden to.  I simply had to know where it came from because the shape was just so striking to me.  She said she made it. That blew me away.  She told me what the pattern was and I told her maybe I'd get to it someday.  Then the best thing happened.  I didn't really know her at all, just another mom in the class, but she offered to help me through and explain the tough parts if I needed help.  That offer of back-up was all I needed to try and tackle it.  It took me a year, but I tackled it.
I ended up just using some helpful blog posts to get me through the confusing parts.  There were times when I thought that it was waaaaayy too much effort (like cutting out what seemed like a million pieces of fabric and interacting and like standing over a hot iron forever ironing on each piece of interfacing... so, pretty much the very beginning steps of making it!),  but thinking about being able to carry a bag just like hers kept me pushing through.
Here's how my first one turned out. 
The second time around I have a whole lot more experience sewing bags, even drafting my own patterns.  I have more experience with interfacing and I know my own preferences.  If you want all the details of what I chose to use where, I can tell you, but for the sake of the readers who would just like to see the bag.  Here are some pictures.


The above picture is right before the last step.  You have an outside and an inside and a strap.  I remember being so scared the first time around that after getting this far, I would totally mess it up putting these three together.  It's counter intuitive how the pieces get sewn together and you feel like you are sewing blind (unless you've made other bags, in which case you've already done something similar to this).
You may see that I've upgraded to a zip pocket instead of the small interior pocket.


There she is.  I was almost too lazy to add this because I'm still not that good at it, but I'm glad to have it now for my phone and lipgloss and hair bows that get pulled out of little girls' hair.
One other thing I did differently was to baste the strap on before putting the bag together.  I just pinned last time and that was really difficult and also made turning the bag right side out a bit treacherous.
I also left the hole for turning in the side of the interior instead of the bottom, just because the bottom holds all the weight and the stitches used to close the hole are less obvious in the side.


I literally wore my last one out and I hope I enjoy this one just as much.  I got compliments EVERYWHERE I carried my last one, so I'm looking forward to that again too. :)
This is not a simple pattern.  The bulk of the interfacing, the curved seams, the gusseted bottom and other things make it a challenge, but if you love it as much as I did when I first laid eyes on it and are too afraid to try it...
I'll give you the same gift that the mom in my daughter's signing class gave me.
I'm just an email away.  Let me know if you need help and I'd be glad to work you through it.  Comment if you need help, leave your email address and I'll contact you.

Sunday, July 29, 2012

Wide-leg Pants

I'm ready to reveal my new wide-leg chambray pants.  These are self-drafted, elastic-waisted and a pretty fun shape.  The eyelet trim wasn't in the original plan, but even after adding length at the bottom when I cut them so I could have a nice thick hem, I ended up with a skinny hem and the need for about a half-inch more length.


I think the length issue ended up with a happy ending and adds another touch of unique to these. (worn with Simplicity 1872)


I tucked in a shirt for you so you could see the waist.  I made the front pieces almost the same as you would for a flat front pant and added all the extra in the back.  That's where I need it anyway.


Don't tell anyone, but I aspire to create a pattern for these.  I have plans to start drafting next week!

Friday, July 27, 2012

The "Birds in My Closet" T-shirt


My full post about this top can be found at The Sew Weekly.

Tuesday, July 24, 2012

Back to Little Things

Fall is coming.  It may still be a couple months away, but it IS coming... I hope.
I am going to sew like it's coming anyway.
My four-year-old, Eden, has a pretty substantial wardrobe, but many of the pieces I've made for her recently won't transition into cooler weather easily.  So I've been cutting and planning and sewing.


I bought $50 worth of fabrics in a shop in Marietta, GA last time we went to visit the family and I'm determined to dig right into it.  I find that if I let it sit, I lose my enthusiasm for sewing it and it just piles up.
Here are a few of the things I've accomplished so far.

This would be an obvious "back to school" choice in fabrics, but I really just got it because it caught my eye and when I picked up the bolt for a closer look, Eden said, "I really like that one!"  That, of course, sealed the deal.  She's been really into Hello Kitty lately, so I bought a fun Hello Kitty themed ribbon for the bottom.  This is Simplicity 6884 shortened to a blouse.  I took out half the pleats too because I thought four pleats on front and back might be a bit much with the "skirt" being just a peplum.  I just acquired some brown knit Matilda Jane ruffles that I think will look cute with this.


This is another top I technically made for Eden, but Arielle, whose torso is almost the exact same size around wanted to wear it first, so she got to be my model.  I finally used the leftovers of this owl fabric that was languishing in my extra fabric pile.  I had cut the rest of the yard into a bag that was never sewn up. :(


Here is a dress I really did make with Arielle in mind.  Eden is jealous and wants a t-shirt dress now, so I might have to work that into the plans for the rest of my fabric.  These are so comfy and I think this style will look particularly cute with a cardigan.


This top is just my own design.  I've sewn enough different bodices now for Eden that I have a pretty good idea of how to do what I envision.  I just cut out what I new I needed and sewed it up.  No pattern pieces or even drawing on the fabric.  I just eyed it.  Of course, this means I can't duplicate it without tracing around this one.
I know this still looks like summer, but I made the skinny straps  (which you can't see in this picture) specifically because I prefer that look with a shirt under.  I'll make her some pants to match, but in the meantime, I whipped up some shorts.
The shorts are MonkeysBug Sweet Sailor Ruffle Shorts and I really like the design and the fit.  I don't like them styled as MonkeysBug styles them.  I really don't think they look sailorish at all and I wasn't going to force it.  Maybe they would in the right fabrics.  They were a good alternative for me to the Oliver + S Picnic Shorts.

Cute and easy pocket detail on the back.  I have already stolen this pocket to use on two other garments because it's just that cute.

And then here's a little sneaky peak of some pants I made myself.  I was trying them with the Matilda Jane Peppermint Dress just to see.  That is eyelet trim peeking out from the bottom!  I'm getting more into embellishments lately.  I'll style them up for you later.


Sunday, July 1, 2012

McCall's 6349


My first underlining.  My first exposed zipper.  My first time sewing with seersucker (I realize that's not really an accomplishment, but it's still a first).
And, my first time using a tripod to help me take pictures.  Brilliant idea, I know.  Who would've thought that using a tripod might be easier than balancing the camera on pillows?

I was inspired after finishing this dress to do a "one dress four ways" post like Jessica Quirk at What I Wore.  Sorry I don't have a bag too, but you do what you can with the brain cells and time you have left after 3/4 of the day with two toddlers has already passed. 

First up: my pin-up impression


You get a peek at the exposed zipper and the grosgrain ribbon tie I had to add at the top to cover the exposed zipper tape ends.  I just used a 7" jeans zipper and it almost wasn't long enough.


Here's my patriotic get up.  This dress is definitely a good candidate for the 4th, but it would be a shame to get barbecue sauce on it...


Probably my favorite look, just because this necklace (BaubleBar) and these shoes (GoJane) are brand new.  I was really getting desperate for poses and was trying to channel my Anthropologie catalog for this one. :)


The lining and underlining of the dress is Moda Sunkissed quilting cotton.  I had it in my stash waiting to be the backing for a quilt I started two February's ago (!!!), but I don't think I want a big ivory quilt back any more.... if I ever even get around to finishing it, that is.
I love script on fabric, so this is just a little happy for me on the inside of the bodice and under the skirt.


Just one more look.  I probably could've found some different shoes, but I was grabbing stuff so fast I just didn't think of it for this outfit.  I researched on Pinterest for ideas and wearing a chambray shirt over this would have never been something I would've thought of if I hadn't seen it in a picture.


I have no idea how I got so many good pictures and had so many posing ideas because the rest of my day was bananas and ended on a pretty rotten note.  I wish I could get this inspired and have this many good photos of everything I make!
Find my feature and a little bit more about the actual construction of the dress on The Sew Weekly.