"Why in the world did you pick this name for your blog?" ...so glad you asked...

Tuesday, June 25, 2013

Jolijou Shelly Sew-Along: I Know We Just Started, But Now We're Through

This top is truly a quick sew.  After you've got your side seams sewn up, there's only the neck, arm and hem bands to add.
I have to stop right here and admit that after I realized that I was working with three different knits with three different amounts of stretch and I am going to have variability in the length of strip I need, just like the pattern says.
And ladies, when I get derailed off of the pattern, I usually get totally derailed.  I didn't even look at the widths for the arm bands or neck band or hem band.  I just experimented with what I thought would look good and what would give me some variety.

Back to my very first muslin.  I didn't have very many options when it came to fixing it.  No extra seam allowance on the sides to let it out and, from my other experiments, I thought that unpicking the neckband and letting loose some of the gathers wouldn't really help a whole lot either.
I decided on a random idea that popped into my head based on a vintage dress pattern I'd seen.  I cut triangle shaped inserts, opened up the side seam starting at the end of the sleeve and sewed in some extra room for myself.

Then I chose skinny bands for the ends of the sleeves and a thicker band for the waist, more similar to the pattern, but my shirt is significantly shorter.
Here's the finished product.

This is a good length for me...in the front.  The yoga band makes the fabric pool atop my derrière in the back.  Which is not my favorite.


I discovered that if I stand with my hands on my hips everywhere I go, I can pretend that my armpit inserts fixed the pulling problem.


But, just between us, those wrinkles are still there.


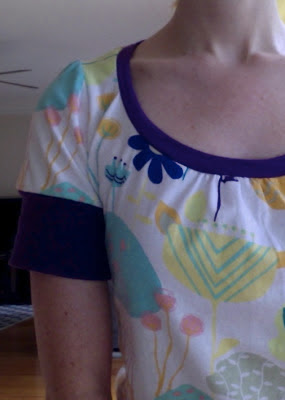
I haven't completed the grey sweater knit version (my second muslin), but I did complete my third muslin.  I tried thicker, contrasting armbands, a longer shirt length and no hem band.


I think I'll get quite a bit of wear from this one.  It's very comfortable since I gave it more room in the armscye.  I love the fabric (glad I saved it for third!) and I like the contrasting bands.
Just goes to show that sometimes you have to find the exact right combination of things for your body and many times, a pattern can be altered a bit to work for you.  You just have to train yourself to have a critical eye.
The wrinkles are still there in this version (see how the sleeve looks twisty too?) because, as we already discussed, I would need to redraft the armcsye and sleeve to have the correct shape in the front AND the back.  

I realized after my last post about my pattern/fabric stash, that I do want to make another t-shirt in the near future and I really love the neckline of Shelly and the shaping through the waist.
See? I like how it fits my curves.


So it's still worth frankenpatterning.  I don't feel confident redrafting the sleeves for myself, but I could just steal an armcsye and sleeve from another pattern that works for me, trace it and then trace Shelly onto that. 
We shall see.


Monday, June 24, 2013

A Stashbusting Half-Year Ahead

Aw, man!
Kelly of Cut Cut Sew has just thrown down the gauntlet and I am feeling the conviction to match her pledge.

You can read her post and drool over her fabric and patterns here.

In a nutshell, Kelly has pledged to stashbust, that is, use the patterns and fabric she already has, for the rest of 2013.  That means not buying any new fabric or patterns.
I have done short term similar pledges in the past, some successful, some.... um... not so much.
I won't show you everything I have, but I'll show you the stuff that's matched up that really needs to be sewn and enjoyed and will be the bulk of my stashbusting pledge.

Here are some patterns already matched with fabric.  Not to say that these matches might not change, but most likely, these will stay paired.

Turns out I'm being a scaredy cat about the swim suit.  Might be nice to actually have it this Summer though, don'tcha think?


The accessory cardi that's not really for warmth. 


This is cut and ready to go.


You can't see it very well, but I have loads of dark blue jegging fabric there.  I want some leggings with some sort of cute detail (like a cuff with some little buttons on the side) and I want to make some for both girls.


This fabric has been waiting for over a year now to become a coat...


This minty aqua linen-look fabric has also been very lonesome for a long time, waiting to become a blazer/jacket.


I'm not sure which will be a cardi.  I noticed that these both look good with the feather fabric you'll see down below, so I may make a t-shirt to go with the feathers with one of these knits.


I've had the Thurlow pattern ever since I tested it way back when.  I truly need some shorts this Summer and I bought this denim at Hancocks not too long ago, but wouldn't it be nice if I actually made it into shorts so I could wear them!?


More knits, paired with dress patterns this time.


Here are the feathers I was talking about.  I have a button down shirt in mind for these (Simplicity Lisette Traveler pattern).  I can see this being a wardrobe staple like my chambray button down has become.  I am so in love with these feathers and the colors.


Here's a ponte hot pink and black knit I don't have a pattern for.  I am thinking something like a simple sheath to show off the large scale print of the fabric.


Just a lovely little rayon challis I was drawn too.


I have no idea what to make with this... I just keep hoarding.


And here are the patterns I have never used that I'd be interested in pairing with some fabric in the near future.

There are more patterns and there is a bit more fabric (just talking about what I would use for me, not what I've got in mind for the girls), but that's the main bulk of it.
So, here's what I'm going to do.  I will, along with Kelly, pledge not to buy any more fabric or patterns for me for the rest of 2013...
 UNTIL/UNLESS I use all of my above pairings.
That means I need to make 13 garments for myself before I buy any more fabric or patterns for myself.
(I keep saying "for myself" because I'm not making this pledge concerning fabric and patterns for my kids.)

This is a bit flexible if an emergency comes up.  But I promise to fully disclose any emergencies right here on the blog.  :)


Sunday, June 23, 2013

Jolijou Shelly Sew-Along : Let's Begin Sewing and The ArmPit Experiment

The first step after we cut out our pieces is to sew our shirt together at the shoulder seams.  I used some clear elastic to strengthen the seam.
In the past, I have used twill tape, but the clear elastic doesn't add as much bulk to the seams.  If you are not using either clear elastic or twill tape, at least do another row of stitches 1/8" away from your first to strengthen that shoulder seam and make your garment sturdier.

The next step in the instructions is to do the sleeves.  Put in a gathering stitch between the notches and then line up the center of the sleeve with the shoulder seam and pin. This sleeve does not have a front or back as in some patterns.
 I didn't bother to pin all the way around the sleeve, I just started sewing at the end and stopped when I got to the gathering stitches.

And then I pulled the bobbin thread right there to gather the fabric to fit the sleeve opening.


The rest of it is rather unscientific.  I just gathered up the other side approximately the same amount and continued sewing.

Then, you sew down the length of the side seam, starting from the sleeve opening, past the armpit and down to the bottom of the shirt.

After I did all that, I tried it on to see what difference my new sleeve opening shape made.


Plenty of room!

But I have a good impression of a flying squirrel to show you...


Oh my.
That's not so attractive.
Remember how I said when we were putting the sleeve on that the front and back are both the same?  Yes? Well, this is what you get when you essentially cut two fronts.  Really, the front and back of a sleeve opening or armcsye, are two different shapes, one is usually shallower than the other.

I suddenly had the realization that this is the REAL reason for the drag lines from neck to armpit and the reason my sleeve looks a little twisty as well.

We must now consider this my third muslin.  sigh.
At this point, if I wanted this to fit with no extra wrinkles at my armpits, I would need to redraw a different back piece and completely redraft the sleeve.  I am not willing to do that.  It's too bad that Jolijou left us with this conundrum.  Shelly has so much potential.  Nobody's perfect, right?

I went ahead and shaved some of the squirrel wing off and added the neckband.  Here's my last pic for the day.


Saturday, June 22, 2013

Jolijou Shelly Sew-Along: Picking Your Size

Hi, Shelly Sew-alongers!  Do you have your muslin fabric all ready?  We all know not to cut into our bestest, most favorite fabric yet, right?  good.

As you probably already know, this pattern has a handy little measurement chart to tell you what size to cut based on your personal body measurements.  For many of us, this part is no fun because we don't really enjoy putting that measuring tape around us and discovering that the number was much bigger.... or smaller.... than we expected.  Please, I implore you, ignore whatever you think those numbers mean or the feelings you associate with them, because guess what?  Every body looks it's best dressed in something that fits well.  You are stuck with what you have at the moment, so lets put the best fitting Shelly on it that we can, ok?

Now here's where this sew-along may just become much more valuable to you than you thought, because I might save you a step.  If you just go by the measurements for the chest, I fear with this pattern, you may end up with a too-tight shirt up top and that is no fun to wear.  Let me show you what I'm talking about.
I cut an xsmall and tapered out to a small at the hips.
Here it is after the neckband has been sewn on.

See those lines pulling from the collar to my armpit?  Thatsa no comfy.
I suspected when I cut the pattern that there might not be enough armpit room, but I'm not going to go changing a pattern I've never sewn, just on a suspicion. 
I had already cut it out in a sweater knit in exactly the same size, so I tried an experiment.
Here it is without the gathering and without the neck band.
(sorry for the low-quality pics here)

There's no pulling at the armpits, nice and relaxed.  While I was standing there like that, I pinched a couple inches of the front together to simulate the effect of gathers and didn't notice any pulling.  New hypothesis: The size and armpits are fine, but there is too much gathering.
Here is this same top with about 4" slightly gathered and the neck band sewn on.

There are those drag lines again!!
So here's where we end up in today's post, my recommendation for the easiest possible fix is to cut a bigger size than your measurements at the bust and don't be very aggressive with your gathering at the neck line.
One step up from that: If you like a multitude of gathers (as in the actual pattern design) then cut a size larger than your bust measurements AND put the "fold" line of the pattern piece a couple inches away from the actual fold of your fabric, giving you more width in the front to gather without sacrificing armpit space.
Lastly and most involvedly: You can get a tee that you like the fit of on you and redraw your Shelly armpit based on the armpit of the tee.
Then go to your sleeve pieces and extend the side by approximately the same amount as you extended your arm opening.

Thusly:


I will be back with my THIRD muslin.


Wednesday, June 19, 2013

Jolijou Shelly Sew-Along: Before We Start

Hi adventurous ladies, sewing for yourselves!  I am honored to be hosting a sew-along for the EuroStyle Sewing group on Facebook, but if you have found my blog and would like to join in, of course you can!  The great thing about blog-hosted sew-alongs is that they are open to all and not really time sensitive.  Do things at your own pace.
During this sew-along, we will be making something just for us that we could, potentially, get a lot of wear out of, some selfish sewing at it's best!  The pattern we have chosen is the Shelly shirt from Jolijou which can be bought here.
You can see some examples of finished shirts here.
Now, you might notice that the instructions are not in English.  That may not be a problem for you, but if it is freaking you out, do not fear, Google Translate is here.
All you need to do is buy and download the pattern, open up Google Translate in your browser, and get started translating.  Just below the empty box where you could choose to copy and past text if you like, is the option to click on "translate a document."  Click that.  Choose the file you just downloaded, the Shelly PDF that says shelly-anleitung.pdf.  Voila!  Translated to mostly understandable English just for you.

Now, just a couple of things before we begin.  I suggest that you not use your fanciest, most favorite knit for your first Shelly.  Although it can be a pain to make a wearable muslin, it can be more disheartening to make something in a fabric you love, only to realize that if you'd just known to tweak this or that in the pattern, you would have liked the garment a lot better.  Trust me, I've done it.  Then I've put it in my closet, because, after all, I loved the fabric.... then I get disappointed all over again every time I look at it and it never gets worn and the pattern gets put in my "probably won't be making this again" pile.

Secondly, be careful about the knit you choose for your final shirt.  What we love while it lays on the cutting table in front of us, we may not love on our bodies.  If you have not sewn for yourself much, it may take some time to be discriminating and learn what you like and what looks good on you.  I had several mis-steps in fabric choice over the first year or so of selfish sewing and only after I really started paying attention to what I already had that I loved and what I was drawn to when shopping, was I able to better train myself to choose fabric that I would really enjoy wearing.
Along that same vein, don't let someone's not-so-stellar fabric choice in a Shelly deter you from the pattern.  It's a basic t-shirt with variations and with smart choices based on your body type and the season, that is something we can ALL use in our wardrobes!

I'll be back Friday with the first real installment of the Sew-Along!

Monday, June 17, 2013

The Story of the Graduation Dress

I said in my last post it would be a saga that I would be telling, but I think it's like having a baby, you forget the bad details in the fog.  So this really won't be such a saga after all.

I used the bodice of McCall's  6647 because of the great cut-out in the back.  I wasn't thrilled with the skirt on it because I was looking for something long and floaty this year.  I did a muslin from a thrifted sheet that I just keep cutting up for muslins.  The great thing about this pattern is that it has cup sizes.  I still haven't ever done a small-bust adjustment... and I still didn't have to with this. Hooray!
There are darts beside and below the "girls" and the bodice is fully lined.  I got a little confused when sewing the lining to the bodice, but it really was no fault of the directions.  I thought to myself, "I've done something similar to this in a little girl's dress before.  I'll just wing it."  Somebody slap me next time.  Turns out, you can't turn something right-side-out after you've sewn up a complete circle on the back.
Once I got out my seam ripper and followed the directions, it went smoothly.
I thought the back was heart shaped by the way the envelope looked, but no, it's a circle.
You know what the most awesome thing about this was when I finally got the bodice done in the actual fabric and tried it on?  I discovered I was going to be able to wear a bra!  That's a total plus in a pattern with back interest.

Then here is where the difficulties commenced.  Instead of describing ALL my troubles and how I fixed them, I'll just tell you a couple.

I was a bit concerned about the skirt of McCalls 6698 not fitting the bodice since it was, after all, made for a different bodice.  I figured it might be a little big, and therefore, sag in the back or something.  
Instead, I encountered the opposite problem and was completely unprepared.  The skirt was actually too small in the circumference of the waist.  I had to skimp on my seam allowances and do some eyeing of side seams.
My other concern/issue with the skirt was how to put three layers together and not have an exposed seam at the back waist.  I could have just done some bias tape made from the same fabric, but I really didn't want any stitching showing there.
I ended up sewing the middle and long layer as per the instructions (laid atop one another just as the skirt hangs when finished) but I sewed the shortest outer layer to the skirt while it's right side was facing the wrong side of the longest layer.  So I sewed the shortest outer layer to the inside of the skirt essentially and then flipped it over the other layers to the outside to cover the seam.


Wanna see the whole finished dress?


I do have to mention that each of those three tiers felt like it was a mile around when hemming.  The dress was just a big, slippery blob that I kept having to readjust as I worked my way around and around... and around those hems.


I felt really good in it even though it did fit like a (tight) glove.  The fabric flowed wonderfully when I walked and made me feel like I was totally appropriately dressed to be at the water's edge at a yacht club... which is exactly where we were.

That's me and the Graduate.  He's a for-real radiologist now.  I might finally start to feel like a for-real seamstress one of these days.  Everything I make that I am proud to wear gets me one step closer. 


Wednesday, June 12, 2013

Pixels and Frankenpaterns

The original post with ideas forming about the dress I would make for my husband's grad dinner this year (his final year of residency!!) is here if you want a refresher.
At the urging of a sewing friend and with the encouragement of my husband, I chose to frankenpattern the bodice of McCall's 6647 and the skirt of McCall's 6698.
I found this amazing rayon challis at Fabric Mart.


My nails are freshly painted because I drive back to Jackson, MS in the morning for the ceremony/dinner that evening.  Because of my wet nails, I'm typing funny, so I'll do a complete review/sewing saga later with more pictures.
I sewed in an invisible zipper that is actually nearly invisible.
I hand-sewed almost the entire bodice interior and that was a LOT to do.
Random good news: I discovered I can wear a regular bra!  Hooray for no stick-on cups!
Suffice it to say, the involvement level of sewing this dress met or exceeded last year's dress.
Here it is, sprayed with water because I'm hoping the wrinkles will hang themselves out overnight.  I do NOT want to wrangle that on an ironing board.


Tuesday, June 4, 2013

Farbenmix Yelena for the Fourth

I will try not to ramble, but it's late as I write and I'm feeling kind-of scattered.
I've been participating in the Yelena Sew-Along over at Burlap Button to make my first pair of Yelena pants (only my third Farbenmix pattern ever attempted).
One of the hardest things was decoding what pattern piece was for what and how my fabric choices would translate to the actual garment.  Like, you know, when you see a tiered peasant dress, you might be able to imagine how it would look with one fabric for the bodice and sleeves and different fabrics for each tier.  You can envision the finished product because it's fairly straightforward how the pieces are put together.
Yelena is a tricky one, though.  The sew-along posts helped a bunch to decode the pattern and it also helped to stare for hours at other beautiful Yelenas on the web.
After much hemming and hawing, I finally decided on the outside fabric (a Japanese print that I had a mere half-yard of) and then realized that I had no basics to blend with it for the underneath fabric that peeks out at the top and the bottom of the pants.  Off to the store and back home with a blue and white polka dot and some strawberry buttons to boot.

I followed the first couple posts in the sew-along and then we were supposed to add trim.  Well, you see the dinky little red ribbon I bought?  Yeah, that wasn't going to cut it.  I looked through all my ribbons and trims.... and then looked through them all again before I decided that a piece red crochet and another piece of red velvet ric-rac I had would be just the ticket.  
After the trim is in place, one actually has to sew up the legs and that's the part where I really felt like I was wrestling with these pants.  
Sewing all these curves together in layers that you haven't really traced or cut with the exacting care you probably should have is a whole lot different than sewing up two rectangles with crotch curves cut out.  (holla if you get me)

But I did it.


AAaaaaaand!  Can you believe I was also able to dream up a Farbenmixy tank top to coordinate?  I used the Riviera pattern from Sewing Clothes Kids Love as my starting point.


With all this red, white and blue (and pink, but whatever), it's starting to look a little bit Fourthy to me.  And after working this hard on this set, and having nothing else in mind particularly for Independence Day sewing, I have dubbed this her 4th of July outfit.


I've never really done this much embellishing before (and I know that, compared to some, this is nuthin'!), but hopefully it's a trend that will continue.  Now is the time, when they are still little to use the crazy cutesy prints and crazy cute embellishments.  I gotta take the chance while I have it.

You will certainly see more Farbenmix from me in the future as I dream up Kindergarten outfits for my girl!


Monday, June 3, 2013

MMM '13 All Done

Another me-made month comes to a close.
Turquoise Colette Clovers.


I went all out for the last day of May. The whole family was me-made. I wore my basic elastic-waist dirndle skirt. Eden wore her "E" appliqué shirt with some knit ruffled shorts.  Arielle wore her Figgy's Banyan Tee and some knit ruffled shorts.
We got this shot amidst playing with the neighbors.  Arielle was walking their dog for fun and Eden was in the middle of trying to catch bugs.